


SURFACE TREATMENTS
Surface treatments and their technological requirements
- MARKING AND SETTING UP SURFACE TREATMENTS IN GRAPHICS SOFTWARE
- VARNISHING:
- METALLIZED SURFACES
- FOIL BLOCKING
- EMBOSSING
- 3D MGI UV SPOT VARNISH AND FOIL
Marking and setting up surface treatments in graphics software
Please mark the surface treatments with separate spotcolor and overprint set to on in the print file. Spot colors should always be named according to the surface treatment (eg “UV varnish”, “Hybrid varnish”, etc.).
Surface treatment markers should be 100% saturated, unless the technology allows for different shades (eg coldfoil, white ink, 3D MGI UV varnish of different heights).
The following describes the related Adobe software settings.
Adobe Photoshop
In the case of bitmap graphics, the spot color marking of surface treatments can be set as follows:
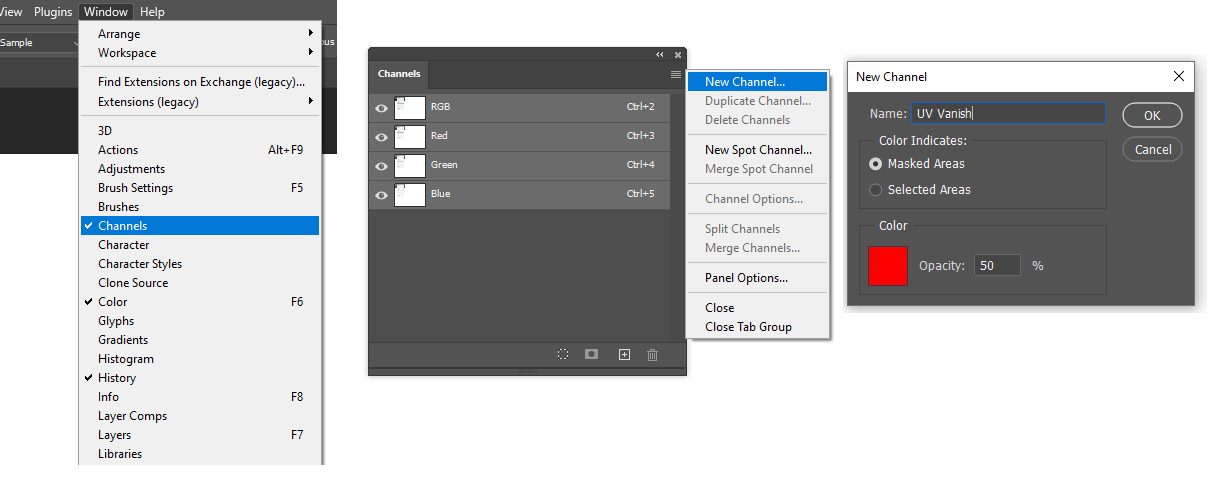
Open the CMYK image file in Adobe Photoshop by clicking the option button (4 horizontal lines) in the upper right corner of the Window > Channels window to select the new spot color channel [New Spot Channel…]. Then, in the window that appears, name it in the Name field with the appropriate name. Click the Color box in the lower left corner to select the appearance of the color (it is recommended to use a setting that differs from the colors in the graphic). By selecting the color channel, we can edit the surface treatment graphics using a new layer. To properly simulate the setting, use the settings in “Setting Up Publication Software for Printing”. You can save the finished image file in .psd or .tiff format for use in Adobe InDesign or Illustrator.
Adobe Illustrator
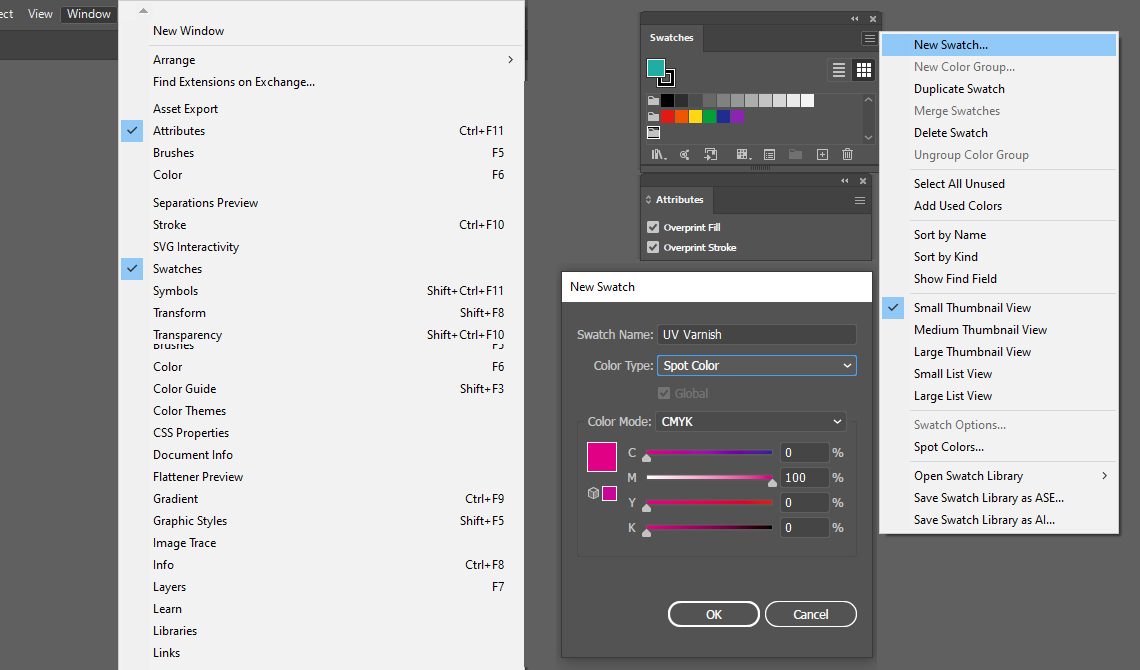
To create spot colors, select Window > Swatches, and then click the New Swatch button (plus sign) at the bottom of the window that appears. Name the color according to the surface treatment in the Swatch Name column, and then select Spot Color from the Color Type drop-down menu. Then adjust the appearance of the color (it is recommended to use a setting that is different from the colors of the graphic) and click OK. Select the appropriate graphics and color them with the new spot color.
To set spot colors to overprint, select them, and then select the Overprint Fill and Overprint Stroke check boxes by opening the Window > Attributes window. To properly simulate the setting, use the settings in “Setting Up Publication Software for Printing”.
Adobe InDesign
To create spot colors, select Window > Color > Swatches. Click New Color Swatch… in the upper right corner of the window (4 horizontal lines). Name the color according to the surface treatment in the Swatch Name column, and then select Spot Color from the Color Type drop-down menu. Then adjust the appearance of the color (it is recommended to use a setting that is different from the colors in the graphic) and click OK. Select the graphics for surface effect(s) and color them.
To set the overprint for spot-colored items, select the Window > Output > Attributes > select the Overprint Fill and Overprint Stroke check boxes. To properly simulate the setting, use the settings in “Setting Up Publication Software for Printing”.

Varnishing
Traditional UV spot varnish (glossy)
In the case of varnishing with conventional screen printing or with flexo cliché, the minimum line thickness is the same as the generally printable line thickness (0.025mm).
In the printed file, please mark the parts to be varnished with a separate spot color called “UV lakk” or “UV varnish”. Surface treatment markers should be 100% saturated and set to overprint.
The varnish is applied to the sheet using a printing plate. The minimum printable line thickness is the same as the generally printable line thickness (0.025mm).
In the printed file, please mark the parts to be varnished with a special spotcolor called “Matte oil spot varnish”. Surface treatment markers should be 100% saturated and overprint.
Unlike traditional screen-print varnishing, the process uses two coats of varnish. The first layer of oily varnish is applied to the print using a printing plate. The second layer of UV varnish is applied from the varnishing unit to the entire surface of the sheet. At the junction of the two layers, the typically crunchy, matte surface of the hybrid effect varnish is formed. According to the thickness of the oil varnish, we distinguish between fine and coarse hybrid effect varnishing.
In the graphic file, the matte elements (eg: “Hybrid matte varnish”) should be marked with spot color. Objects should always be 100% saturated and set to overprint.
The minimum line thicknesses that can be safely printed are as follows:
- 0.4 mm for “fine” effect varnish.
- 0.8 mm for “rough” effect varnish.
You can download our detailed help on hybrid effect varnishes by clicking here.
An eye-catching and special surface effect using screen-printing in which a varnish containing a metal pigment is applied to the finished print to varying degrees depending on the desired result. Different effects can be achived by changing the screen.
In the case of glitter varnishing, it must be taken into account that glitter grains are omitted in the case of lines thinner than 0.75 mm.
In the printed file, please mark the parts to be varnished with a separate spot color called “Glitter varnish”. Surface treatment markers should be 100% saturated and set to overprint.
Varnish exclusion on the blanket
In cases where we apply a full varnish instead in spots, but still need an unvarnished surface, eg for the date stamp, we can achieve this by cutting it out of the varnish blanket. Please mark the varnish exclusion with a vector rectangular outline, with a separate spot color called “varnish exclusion” or “Unvarnished area” and set overprinting on.
METALLIZED SURFACES
Cold foil
The principle of the cold foil process is illustrated in the figure below.
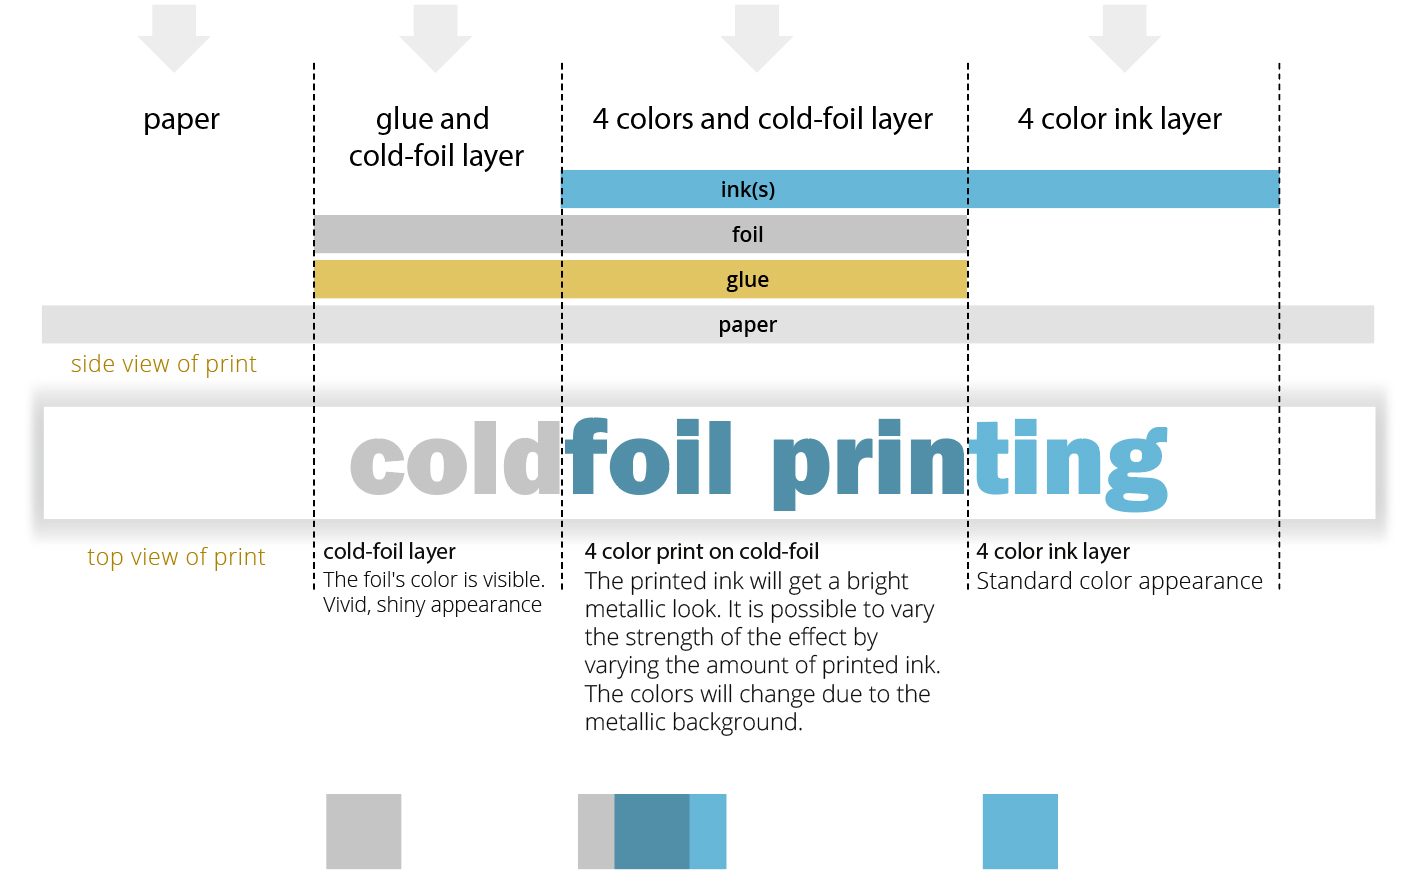
The cold foil parts are applied first, followed by the inks. The following surfaces can be created on the sheet:
- color of unprinted substrate (usually white)
- ink printed parts (normal colors)
- unprinted silver or gold metal foil
- ink-overprinted silver or gold metal foil (metallic colors)
Metallic colors:
By printing the colors onto cold foil, a metallic, shimmering effect can be achieved. However, it is important to keep in mind that this will also change the color behavior of the colors.
Colors printed on silver metal foil always darken and their shades may change. For this reason, it is worth starting from the midtones, taking care that the image retains it’s contrast even after darkening. Darker, more saturated colors have less of a shimmering metallic effect. Colors that are too low in saturation can lose their color intensity, turn gray, or change their hue drastically when printed on cold foil. Therefore, use colors with caution which have less tint than 40%.
Cold foil technology can be used not only with silver but also with gold base metal foil. In this case, the hue shift of the colors on the gold foil is even greater than in the case of the silver.
Technical limitations
- Shades cannot be safely printed at tints below 20% and above 60%, as dot loss or filling in may occur. This can result in cloudiness in a regular tint area. For shading, we therefore recommend the use of irregularly arranged patterns (e.g., graininess, scattered dots). Using these, the problem is less noticable.
- In the case of individual graphic elements (eg lines, letters, emblems, etc.), the minimum line thickness that can be safely printed is 0.15 mm.
Graphic preparation:
Please mark the cold foil parts in the printed file with a separate spot color. Also, all cold foil elements should be set to overprint. Make sure to omit the cold foil parts from the color graphic – or set their overprint to knock-out (off), where the foil will not be overprinted.
Printing on metallized base
The principle of the procedure is illustrated in the figure below.
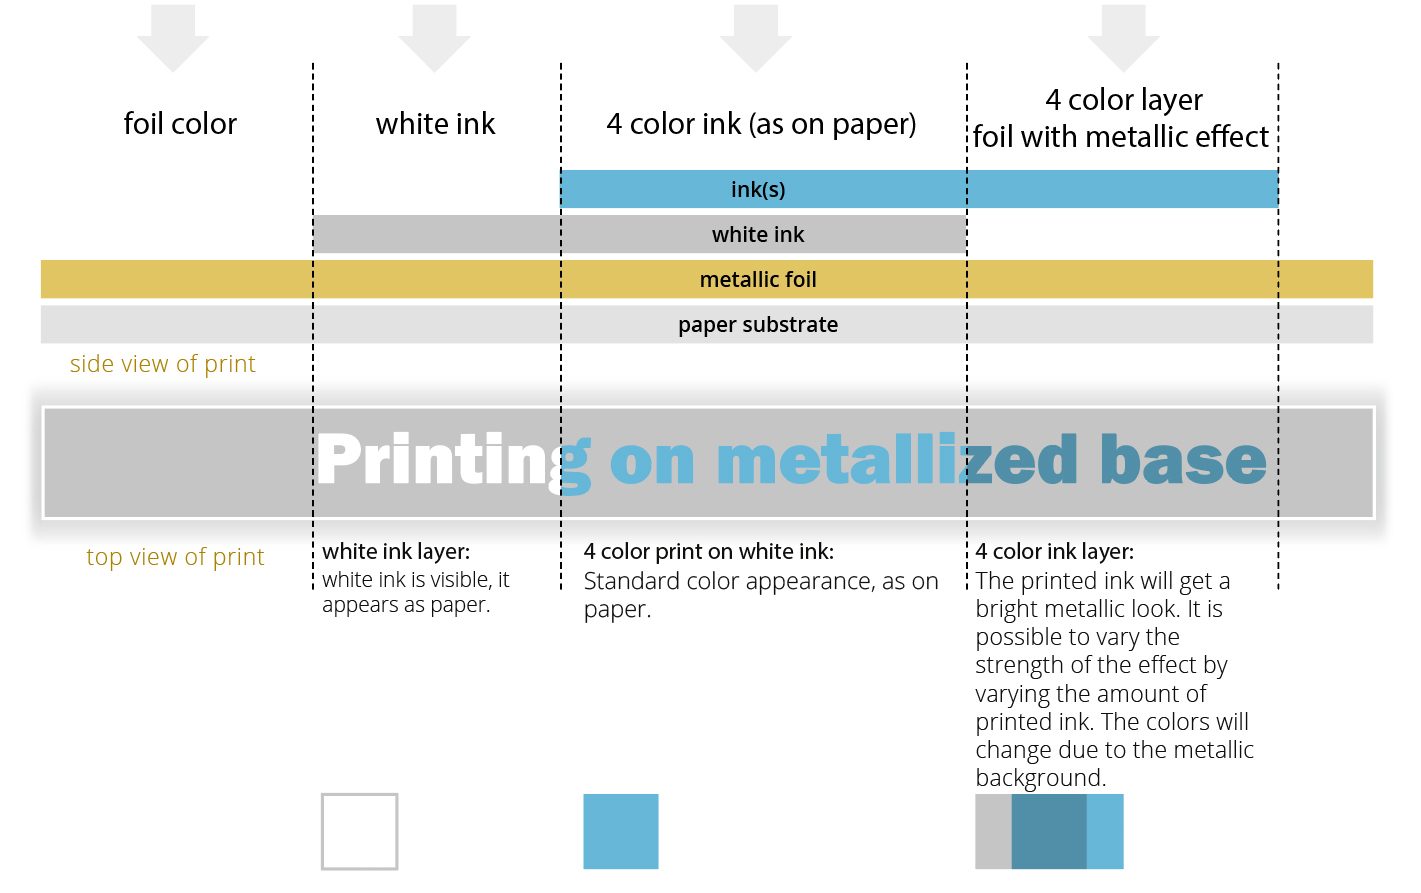
When printing a metallized substrate, the entire surface of the media is metal foiled. By overprinting this base, colors with the same metallic effect as the cold foil process can be created. Where we do not want the effect of the metal foil to appear, it is necessary to apply a covering white ink. The following surfaces can be created on the sheet:
- unprinted silver metal foil (base color of the substrate)
- metal foil overprinted with white ink (this will appear white on the print)
- ink on foil, omitting white ink (metallic colors)
- ink on background white (flood) ink (normal colors)
- Unlike cold foil, it is not the metal foil that needs to be marked, but the white ink. In the print ready file, please mark the white ink graphic with a separate spot color. In addition, all white ink objects should be overprinted.
- Black shouldn’t be printed on white. Printing black on top of white ink will result in lighter gray than printing black on the silver foil.
- Avoid printing large homogeneous color surfaces with white. These may not be perfectly even.
- Black should be a solid color (0C/0M/0Y/100k). Blacks printed directly on a silver base are intense enough on their own, and there is no need to use the so-called “rich black” color (eg 40C/30M/30Y/100k). If you enrich black with additional CMY colors, you may get a brownish tint.
FOIL BLOCKING
The principle of Hot Foil Stamping is that the embossing foil is pressed onto the substrate using a heated cliché (made from magnesium or copper). The embossing film adheres to the surface when exposed to heat.
The profile of the embossing cliché is made based on the submitted graphics. The safe line thicknesses are as follows:
- Positive lines: 0.2 mm,
- Negative gaps: 0.3 mm.
You can access our detailed Foil blocking design guide for designing graphics that can be easily embossed by clicking here.
Most embossing foils (silver, gold, bronze, etc.) are not transparent. When using them, it is advisable not to exclude the embossing graphics from the file. If a transparent embossing film is used (eg color films), the embossing must be excluded from the color graphics aimed for print, so that the embossing films color is not covered by print.
In the print ready file, please mark the embossing graphics with a separate spot color (corresponding to the color of the ordered foil) (eg “Gold Hot Foil Block”). Surface treatment markers should be 100% tint and set to overprint. The graphic should preferably be a vector object with a contiguous outline.
EMBOSSING
The graphic file made for embossing must not be thinner than the thickness of the raw material to be embossed. Very thin elements are not spectacular on the print.
Depending on its direction, we distinguish embossing as follows:
- Embossing: In this case, the graphics stand out from the plane of the base material.
- Debossing: In this case, the graphics are deepened inwards from the surface of the raw material.
The term “blind embossing” means that there is no foil or print along the embossing.
In the printed file, please mark the embossing with a separate spot color called “Embossing” or “Debossing”. Surface treatment markers should be 100% tint and set to overprint. The graphic should preferably be a vector object with a contiguous outline.
3D MGI UV SPOT VARNISH AND FOIL
3D UV varnish is an extra high-gloss embossed varnish. It is printed on the printed sheet using digital ink-jet technology according to the shapes, saturation and position specified in the submitted file. The adjustable height of the varnish ranges from 7 µm (microns) to 232 µm. The extent of this can be uniform, but different heights can be used at the same time. The technology also makes it possible for varnished areas of the same height to be foiled. In this case, the foil adheres to the UV varnish. The method achieves a 3D foil block effect without the use of clichés. You can choose from different colored foils for this. Foiled and varnished surfaces can be placed next to each other. In the case of 7 µm thick varnishing, embossing is not perceptible. Surface treatment reminiscent of conventional UV varnish can be obtained by this digital process.
Technical limitations:

Hassle-free production depends on the line thicknesses set in the graphics, the varnish height used, and the surface tension of the print to be varnished.
It is characteristic of the technology that the higher the varnish, the more it spreads. Therefore, it is advisable to use a lower varnish for thin lines. For larger surfaces, higher varnishing can be done safely. Ideally, the varnish remains in the form of a droplet from the surface tension of the substrate, while the varnish defined to be too high will spread more, which leads to the thickening of the lines and filling in of the details.
The minimum line thicknesses that can be safely manufactured are as follows in the following typical cases:
- 3D MGI UV varnish:
- 0.14 mm for the minimum thickness of 7 µm.
- 0.3 mm for the maximum thickness of 42 µm.
- 0.2 mm for digitally printed and foiled paper with max varnish of 42 µm.
- 0,1 mm is possible when using Soft Touch foil and the max varnish of 42 µm.
- 3D MGI UV varnish and foil:
- Varnished sheet: Positive: 0.2 mm, Negative: 0.4 mm.
- Foiled sheet: Positive: 0.4 mm, Negative: 0.7 mm.
Varnishes of different heights can be perceived characteristically in the case of differences of at least 30-40 µm. The lacquer height can be used evenly. In this case, the longer the transition, the better the result. If the transition is too short, the varnish will not change with the desired gradation due to the spread of the varnish. The varnish may end sharply instead of fading away.
When cutting and punching, the varnish should always be omitted 1-1 mm from the cutting line as it causes manufacturing problems.
At a folding line, if the varnish height is above 7 µm, the lacquer should be omitted by 1-1 mm. Varnishes higher than this can break out during folding.
Graphic preparation:
In the print ready file, please mark the parts to be varnished and foiled in 3D MGI with a separate spot color called “3D MGI varnish” and / or “3D MGI foil” and with overprinting set to on. The surface treatment marking objects should be 100% saturated (tint) at the same varnish height. In the case of varnishing at different heights, the graphic file must be created so that the saturation of the highest part is 100% and the unvarnished part is 0% (usually no varnishing takes place below 10% tint).